The Magento platform is one of the most versatile carts on the web today, and one of the driving forces behind its success is its flexibility. Not only are there a wide variety of features included out of the box, but there is an ever-increasing pool of extensions and customizations that can be found to suit the needs of any store. Because extensions are such a large part of the Magento experience, I’d like dive into the process of installing a Magento extension.
How to Install a Magento Extension
In summary,
Step 1. Disable the cache.
Step 2. Disable compilation mode.
Step 3. Choose an installation method.
Step 4. Review troubleshooting instructions below.
Disclaimer
Before we go any further, there are two points that I want to be clear on.
1. Never blindly install an extension on a live site
I know you see messages like this all of the time, but there is no way I can stress this enough. You never know how an extension will interact with your site until you try it, and if it doesn’t work as intended the results could be disastrous.
2. This is not an all-inclusive guide
Every extension is unique, and many developers have started including installation instructions with their packages. If there ever comes a time when you need to choose between listening to me and listening to the extension’s creator, choose the latter.
Pre-Installation Steps
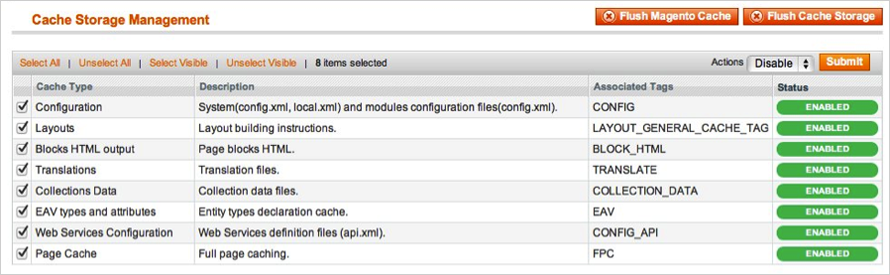
Step 1. Disable the Cache
The Magento front end relies heavily on caching to provide a faster experience to customer. This is a wonderful tool, but can wreak havoc during the installation process. To ensure that the cache is not the cause of any problems, we should turn it off. This can be done from the admin console by navigating to the cache management page (System->Cache Management), selecting all caches, clicking ‘disable’ from the drop-down menu, and submitting the change.

Step 2. Disable Compilation Mode
This may not be an issue for many readers, but if you are using Magento’s compilation mode on your store, it is important that you remove it. Without going into to many details, compilation mode takes many files spread out over the system and condensing them into a single file that can be run very quickly. If an extension’s files are not in the system when this single file is ‘compiled’, they will not be included. To check that this is disabled, go to System->Tools->Compilation. If the compiler status is ‘Disabled’, you are ready to go. If not, simply click the ‘Disable’ button on the right hand side of the screen.

Step 3. Choose an Installation Method
There are two different methods used to install extensions (no, ‘make someone else do it’ doesn’t count). The first involves taking advantage of the Magento Connect Manager, while the second involves manually installing the files via ftp or command line. The first option is generally used by store owners and is a relatively automated process, the problem is that if there is a problem with this process, you are at the mercy of the connect manager to tell you where the problem is coming from. Option two involves getting your hands on the files yourself and manually dropping them into the Magento installation.
Option 1: Using Magento Connect
Required Materials:
- User account for Magento Connect
- Magento Admin account with access to Magento Connect Manager
As stated before, this option is relatively easy to implement. The first step is finding the link on Magento Connect for the extension you wish to install. Once there click install now. If you are not currently logged into the site you will be prompted to do so. Next, select the version of Magento connect you are using (if in doubt, select 2.0), accept the extension’s license agreement, and copy the extension key.

Log into your stores admin console and navigate to System->Magento Connect->Magento Connect Manager. At this point you will be prompted to re-enter your administrator credentials. In order to install an extension from the connect manager; you must have an account with full access to the administration console. If you were given limited access, Magento will not allow you to proceed. Once you are logged into the manager, simply paste the extension key into the text box and click ‘install’. A system window will appear towards the bottom of the page that will display the progress of your installation.


Congratulations, you have successfully installed the extension on your store. Be sure to test thoroughly before re-enabling the cache/compilation. If you found no problems both before and after these features have been re-enabled, you should be ready to repeat the installation process on your live site. DON’T FORGET TO BACKUP ALL FILES AND DATABASES BEFORE INSTALLATION!
Option 2: Manual Installation
Required Materials:
- Extension Key from Magento Connect OR
- All files used by the extension.
- FTP/SSH access to your website. *
* SSH access is required if you are using an extension key. This option is my preferred method of installation. The connect manager is a useful tool for installing extensions, but I prefer a more hands-on method when it comes to installations. I feel more comfortable when I am personally in control of the process, instead of telling a program to do my bidding. If you are using an extension key you first need to log into the webserver using your SSH credentials and navigate to the store root. We are going to run a simple command that will download the package from magento connect. The syntax for this command is as follows: ./mage download [channel name] [package name] You find the channel and package name by looking at the last two sections of the magento connect extension key, so to download the extension in my example, I would look at http://connect20.magentocommerce.com/community/buysafe_manager and type './mage download community buysafe_manager'.
![]()
Next we navigate to [path to magento]/downloader/.cache/community and copy the file to your local machine. After using your favorite extraction program (WinRAR, 7Zip, etc) you should have a set of files ready to be dropped onto your Magento instance. This next step is geared more to developers than store owners, but actually look at the filenames and directory structure that was just extracted from the package file. Does it look feasible to you? Do you see an app-code directory there, what about app-etc-modules? If you don’t see these directory paths and files contained within them chances are that the extension download was faulty. Take a look at the package.xml file, this is the blueprint used by Magento Connect to arrange the files in the proper places. You may need to use this to ensure that everything is as it should be. Once you have reviewed the extension files you are ready to perform the last step. Using your ftp client, drag all of the files onto the store root of the magento instance. Depending on the number of files in the extension, this may take a few moments.

Now go to the admin console and click 'Flush Cache Storage'. I have found this to be a requirement for any extension that adds pages to the admin console. Logging out and back in is also required to ensure that everything loads properly. If you cannot clear the cache via the admin console for any reason, you will need to clear the cache manually via your FTP client (see the first FAQ question for assistance). That is the final step. Congratulations on a successful installation.
Step 4. Troubleshooting & FAQs
I loaded all files onto my Magento store, and now get a white screen for some or all of the admin console.
This is a fairly common problem, and 99% of the time it is cache related. If you can get to it, go to System->Cache Management and click 'Flush Cache Storage'. This will ensure that everything cached by Magento is deleted and will to be regenerated. Log out and back in to complete the process.
If you are completely cut off from the admin console, navigate to the 'var-cache' directory of your website. You should see a series of directories named 'mage--*'. Delete all of these directories (DO NOT DELETE var-cache). This is the equivalent of flushing the cache storage from the admin console.

I am receiving a Magento error when accessing certain pages. How can I debug this?
This question really deserves a blog post all to itself, but a good start would be to go into the errors directory of your store. Locate the 'local.xml.sample' file and rename it 'local.xml'. The next time you see the error detailed information will be provided explaining where the error took place. Don't forget to change this back when you are finished troubleshooting!
I have a critical error with my webstore and need to turn off an extension I cannot access the admin console. What do I do?
Go to the app-etc-modules directory and open the file that goes with your extension. The naming convention is generally 'DeveloperName_ExtensionName.xml'.

Look for the 'active' tags in the file, change the value from true to false and save your changes. This tells Magento that the extension is disabled and not to run any code associated to it. Deleting the Magento cache is recommended (and most likely required) for this change to take affect.

If you have Magento questions, we can help.